ارتباط آردوینو و بلوتوث و اندروید
امروزه تکنولوژی ارتباط بیسیم با سرعتزیادی درحال پیشرفت است. دراینمیان، فناوری بلوتوث از جایگاهخوبی برخوردار است. بهنحویکه بسیاریاز دیوایسها (مانند: تلفنهای همراه، موس، کیبرد، هدفونهای بیسیم، خانههای هوشمند و …) از این بستر ارتباطی برای انجام کارهای خود استفاده میکنند. ایدهی این فناوری در سال ۱۹۹۴ مطرح شد. در سال ۱۹۹۸ توسط شرکت اریکسون معرفی گشت و از سال ۲۰۰۰ در محصولات الکترونیکی بطور گسترده استفادهشده و همچنان درحال پیشرفت و کاملترشدن است. اینفناوری کمک شایانی به رشد اینترنت اشیاء کردهاست. در اینمقاله سعی میکنیم با یک آردوینو نانو به یک ماژول بلوتوث از خانواده HC متصلشویم و درنهایت توسط آنها، با یک گوشی اندرویدی ارتباط بگیریم.
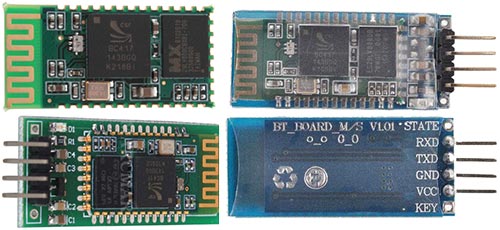
ماژول بلوتوث خانوادهی HC
ازبین ماژولهای موجود در بازار، ما از ماژول HC-06 استفاده میکنیم. شما میتوانید از هرکدام از ماژولهای این خانواده ( HC-03 , HC-04 , HC-05 ) استفادهکنید. این ماژول بهلطف دوستان چشمبادامی قیمت مناسبی دارد. بیشتر ماژولها از تراشهی BC417 بههمراه حافظهی فلش استفاده میکنند و دارای مشخصههای زیر هستند: CSR چیپ: بلوتوث ورژن ۲باند فرکانسی: ۲.۴GHz , ۲.۸GHz و باند ISM ولتاژ کاری: ۳.۳ ولت (۲.۷V – ۴.۲V) جریان مصرفی: حداکثر ۳۵میلی میتوانید شماتیک HC-06 را در زیر مشاهده کنید:
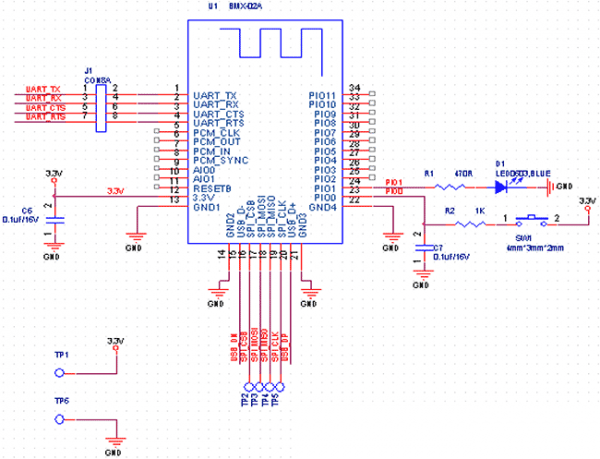
پایههای HC-04 و HC-06 به ترتیب زیر:
UART_TX (pin 1), UART_RX (pin 2), UART_CTS (pin 3), UART_RTS (pin 4) – UART. 3,3V (pin 12) – Power 3.3V. GND (pin 13) – GND. PIO1 (pin 24) – LED working mode indicato
و پایههای HC-03 و HC-05 نیز به این ترتیب هستند:
UART_TX (pin 1), UART_RX (pin 2), UART_CTS (pin 3), UART_RTS (pin 4) – UART. PIO8 (pin 31) – LED1 working mode indicator. PIO9 (pin 32) – LED2. Before paired, it output low level. Once the pair is finished, it output high level. PIO11 (pin 34) – KEY. Mode switch input.
درصورتیکه کلید Mode در حالت صفر باشد، ماژول در حالت ارتباطی و اگر کلید Mode در حالت یک باشد، ماژول در حالت دستوری AT قرار میگیرد.
میتوانید داکیومنت ماژول را از لینک زیر دانلود کنید:
HC-Serial-Bluetooth-Products-201104
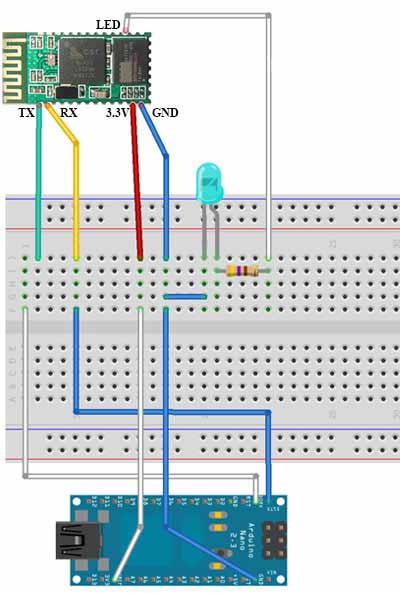
اتصال ماژول HC-06 به آردوینو نانو
پایههای آردوینو را بهترتیبزیر به ماژول بلوتوث متصل میکنیم: پایه ۳.۳V آردوینو به پایه ۱۲ ماژول بلوتوث پایه زمین آردوینو به پایه ۱۳ ماژول بلوتوث پایه TX آردوینو به پایه ۲ ماژول بلوتوث (RX) پایه RX آردوینو به پایه ۱ ماژول بلوتوث (TX) بعد از اینکه ماژول را به آردوینو متصل کردیم، برای تست کارکرد صحیح برد آردوینو و ماژول، برنامه زیر را برای آردوینو استفاده میکنیم:
int cnt = 0; // Counter

void setup() {
Serial.begin(9600); // Initialization
}

void loop() {
cnt++;
Serial.print("Hello BB from Arduino! Counter:"); // print message
Serial.println(cnt); // print counter
delay(1000); // wait 1 sec
}
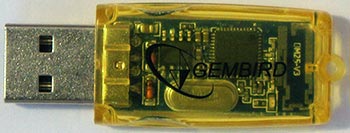
برای صحت ارسال داده میتوانید توسط بلوتوث کامپیوتر به ماژول بلوتوث متصل به آردوینو متصل (pair) شوید. پسورد بهصورت پیشفرض ۱۲۳۴ است. برای مشاهدهی دادههای ارسالی از نرمافزار Tera Term استفاده کنید. پورت مربوط به بلوتوث را انتخابکرده و دیتاهای ارسالی را مشاهدهکنید.

تااینجا توسط آردوینو و یک ماژول بلوتوث، دادههای خود را انتقالدادیم. حال میخواهیم توسط یک گوشی اندرویدی، یک لامپ را خاموش و روشن کنیم. برای اینمنظور برنامهی زیر را روی آردوینو پروگرام میکنیم:
char incomingByte; // incoming data
int LED = 12; // LED pin

void setup() {
Serial.begin(9600); // initialization
pinMode(LED, OUTPUT);
Serial.println("Press 1 to LED ON or 0 to LED OFF...");
}

void loop() {
if (Serial.available() > 0) { // if the data came
incomingByte = Serial.read(); // read byte
if(incomingByte == '0') {
digitalWrite(LED, LOW); // if 1, switch LED Off
Serial.println("LED OFF. Press 1 to LED ON!"); // print message
}
if(incomingByte == '1') {
digitalWrite(LED, HIGH); // if 0, switch LED on
Serial.println("LED ON. Press 0 to LED OFF!");
}
}
}
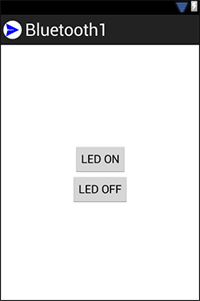
برنامه اندرویدی برای ارتباط با بلوتوث
برای ارتباط با بلوتوث از یک برنامهی جاوا استفاده میکنیم. برنامه را روی دستگاه اندرویدی نصبو اجرا میکنیم. توسط بلوتوث دستگاه به بلوتوث آردوینو متصل میشویم. در برنامه دو کلید با نامهای LED ON و LED OFF وجود دارد که با فشار کلید مربوطه LED روی برد آردوینو روشن و یا خاموش میشود. کدمربوط به برنامهی اندروید را مشاهده میکنید:
package com.example.bluetooth1;

import java.io.IOException;
import java.io.OutputStream;
import java.lang.reflect.Method;
import java.util.UUID;

import com.example.bluetooth1.R;

import android.app.Activity;
import android.bluetooth.BluetoothAdapter;
import android.bluetooth.BluetoothDevice;
import android.bluetooth.BluetoothSocket;
import android.content.Intent;
import android.os.Build;
import android.os.Bundle;
import android.util.Log;
import android.view.View;
import android.view.View.OnClickListener;
import android.widget.Button;
import android.widget.Toast;

public class MainActivity extends Activity {
private static final String TAG = "bluetooth1";

Button btnOn, btnOff;

private BluetoothAdapter btAdapter = null;
private BluetoothSocket btSocket = null;
private OutputStream outStream = null;

// SPP UUID service
private static final UUID MY_UUID = UUID.fromString("00001101-0000-1000-8000-00805F9B34FB");

// MAC-address of Bluetooth module (you must edit this line)
private static String address = "00:15:FF:F2:19:5F";

/** Called when the activity is first created. */
@Override
public void onCreate(Bundle savedInstanceState) {
super.onCreate(savedInstanceState);

setContentView(R.layout.activity_main);

btnOn = (Button) findViewById(R.id.btnOn);
btnOff = (Button) findViewById(R.id.btnOff);

btAdapter = BluetoothAdapter.getDefaultAdapter();
checkBTState();

btnOn.setOnClickListener(new OnClickListener() {
public void onClick(View v) {
sendData("1");
Toast.makeText(getBaseContext(), "Turn on LED", Toast.LENGTH_SHORT).show();
}
});

btnOff.setOnClickListener(new OnClickListener() {
public void onClick(View v) {
sendData("0");
Toast.makeText(getBaseContext(), "Turn off LED", Toast.LENGTH_SHORT).show();
}
});
}

private BluetoothSocket createBluetoothSocket(BluetoothDevice device) throws IOException {
if(Build.VERSION.SDK_INT >= 10){
try {
final Method m = device.getClass().getMethod("createInsecureRfcommSocketToServiceRecord", new Class[] { UUID.class });
return (BluetoothSocket) m.invoke(device, MY_UUID);
} catch (Exception e) {
Log.e(TAG, "Could not create Insecure RFComm Connection",e);
}
}
return device.createRfcommSocketToServiceRecord(MY_UUID);
}

@Override
public void onResume() {
super.onResume();

Log.d(TAG, "...onResume - try connect...");

// Set up a pointer to the remote node using it's address.
BluetoothDevice device = btAdapter.getRemoteDevice(address);

// Two things are needed to make a connection:
// A MAC address, which we got above.
// A Service ID or UUID. In this case we are using the
// UUID for SPP.

try {
btSocket = createBluetoothSocket(device);
} catch (IOException e1) {
errorExit("Fatal Error", "In onResume() and socket create failed: " + e1.getMessage() + ".");
}

// Discovery is resource intensive. Make sure it isn't going on
// when you attempt to connect and pass your message.
btAdapter.cancelDiscovery();

// Establish the connection. This will block until it connects.
Log.d(TAG, "...Connecting...");
try {
btSocket.connect();
Log.d(TAG, "...Connection ok...");
} catch (IOException e) {
try {
btSocket.close();
} catch (IOException e2) {
errorExit("Fatal Error", "In onResume() and unable to close socket during connection failure" + e2.getMessage() + ".");
}
}

// Create a data stream so we can talk to server.
Log.d(TAG, "...Create Socket...");

try {
outStream = btSocket.getOutputStream();
} catch (IOException e) {
errorExit("Fatal Error", "In onResume() and output stream creation failed:" + e.getMessage() + ".");
}
}

@Override
public void onPause() {
super.onPause();

Log.d(TAG, "...In onPause()...");

if (outStream != null) {
try {
outStream.flush();
} catch (IOException e) {
errorExit("Fatal Error", "In onPause() and failed to flush output stream: " + e.getMessage() + ".");
}
}

try {
btSocket.close();
} catch (IOException e2) {
errorExit("Fatal Error", "In onPause() and failed to close socket." + e2.getMessage() + ".");
}
}

private void checkBTState() {
// Check for Bluetooth support and then check to make sure it is turned on
// Emulator doesn't support Bluetooth and will return null
if(btAdapter==null) {
errorExit("Fatal Error", "Bluetooth not support");
} else {
if (btAdapter.isEnabled()) {
Log.d(TAG, "...Bluetooth ON...");
} else {
//Prompt user to turn on Bluetooth
Intent enableBtIntent = new Intent(BluetoothAdapter.ACTION_REQUEST_ENABLE);
startActivityForResult(enableBtIntent, 1);
}
}
}

private void errorExit(String title, String message){
Toast.makeText(getBaseContext(), title + " - " + message, Toast.LENGTH_LONG).show();
finish();
}

private void sendData(String message) {
byte[] msgBuffer = message.getBytes();

Log.d(TAG, "...Send data: " + message + "...");

try {
outStream.write(msgBuffer);
} catch (IOException e) {
String msg = "In onResume() and an exception occurred during write: " + e.getMessage();
if (address.equals("00:00:00:00:00:00"))
msg = msg + ".\n\nUpdate your server address from 00:00:00:00:00:00 to the correct address on line 35 in the java code";
msg = msg + ".\n\nCheck that the SPP UUID: " + MY_UUID.toString() + " exists on server.\n\n";

errorExit("Fatal Error", msg);
}
}
}
(میتوانید برنامه را نسبتبه نیاز خود، کاملکرده و از آن استفاده کنید.)
فایلهای دانلودی موردنیاز
سورس برنامه آردوینو و اندروید و فایلهای APK را از لینک زیر دانلود کنید:
منبع: سیسوگ


